


At BSides Atlanta today I gave a talk on how to handle an incident in AWS. The talk and this post is intended to help those already familiar with the principles of Incident Response to understand what to do when the incident involves the AWS Control Plane. You can find the Slides here.
Why is IR in AWS and the Cloud different?
Because everything needs credentials. Creds are flying around everyone’s cloud applications. Long-term creds, short-term creds, it’s all a bunch of strings. And the strings are easy to find if you know where to look. The EC2 Instance Metadata Service hands them out on 169.254.169.254. You can find them in the environment variables of a Lambda Function. Fargate containers have an environment variable that tells you what internal URL to curl.
All these credentials could give access to view or modify your infrastructure. To properly respond to an incident, you need to know what the attacker changed. Luckily the API-driven nature of AWS helps you there.
Preparation
CloudTrail
The most important AWS service to have for incident response is AWS CloudTrail. CloudTrail records every authenticated API call to your AWS account. Every CloudTrail event includes the principal who performed the API call, the source IP address where the API call came from, when the API call was made, which Action was performed against which Service, and what resources were impacted by the call.
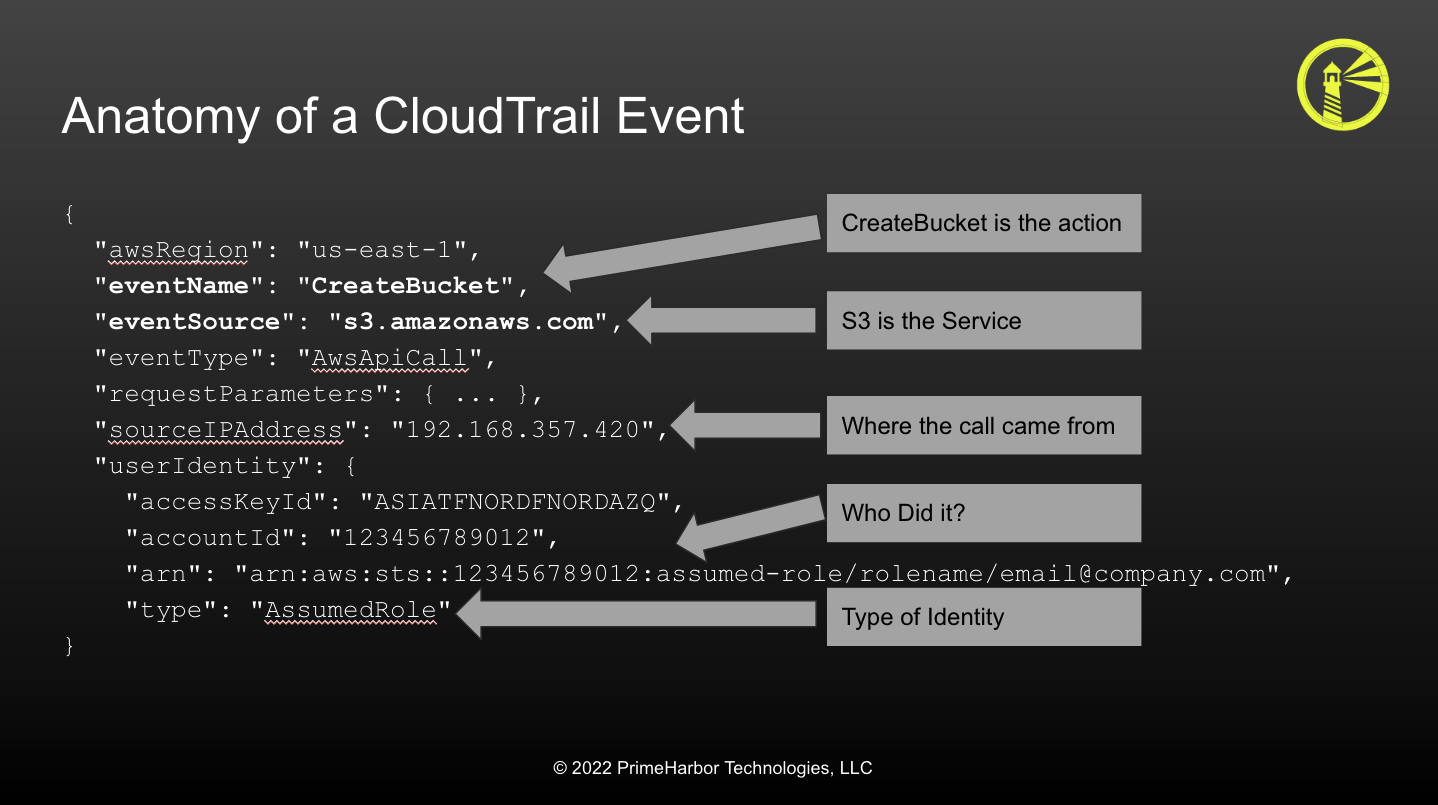
CloudTrail and IAM are linked, and understanding one helps with the other. Nearly Every API call to AWS is authenticated, and all API calls must be authorized. This is done via IAM. While IAM policy creation can be very complex, the core of a policy statement is the specific actions that can be performed. These are broken down by service and API action these then appear in CloudTrail as the eventSource and eventName.
| IAM Action | eventSource | eventName |
|---|---|---|
| ec2:DescribeInstances | ec2.amazonaws.com | DescribeInstances |
| iam:CreateUser | iam.amazonaws.com | CreateUser |
| s3:DeleteBucket | s3.amazonaws.com | DeleteBucket |
| cloudtrail:StopLogging | cloudtrail.amazonaws.com | StopLogging |
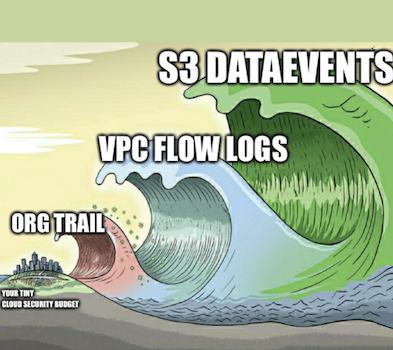
Not all authenticated events are logged in CloudTrail. Only the management events. If you want to track access to specific Data sources, like S3, DynamoDB, or Lamba Functions, you need to enable Data Events for CLoudTrail. Unfortunately, this is not free. DataEvents cost 10c per 100,000 events. This can add up, but the alternative is having to explain to legal counsel you have no idea if the data was exfiltrated.
GuardDuty
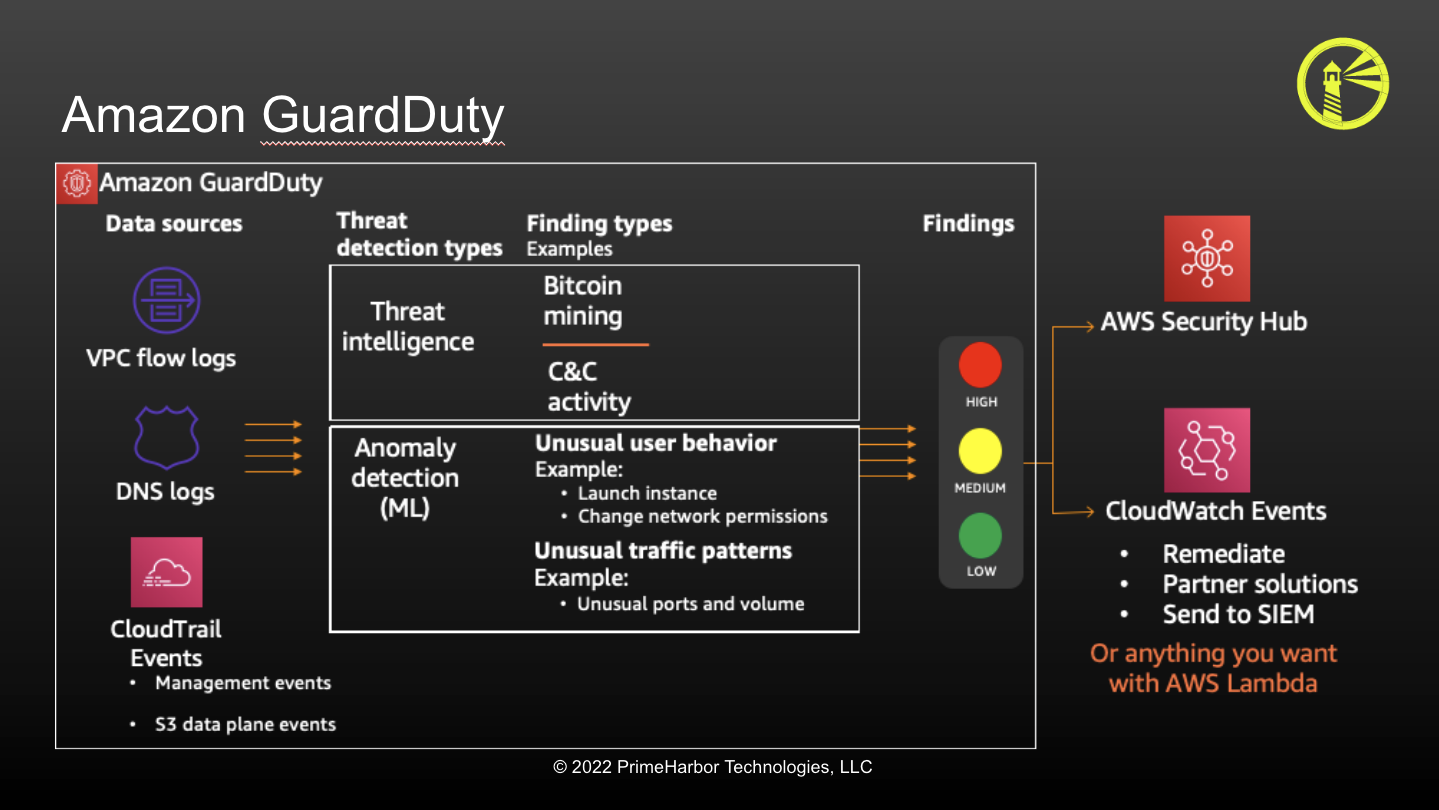
The next Service you want to be enabled is GuardDuty. Amazon GuardDuty is AWS’s managed threat detection service It leverages three primary data feeds:
- CloudTrail
- VPC Flow Logs
- DNS Query Logs The findings it produces are either around an Identity or a Network-based device. The findings can also be explicit or anomaly-based. With Delegated Admin capabilities, GuardDuty can easily manage and deployed via AWS Organizations.
 (Diagram courtesy of AWS - taken from my 2021 ChalkTalk on Adversarial Emulation)
Security Account & Audit Role
I’m a strong proponent of having a dedicated Security Account, and creating a dedicated account for security tooling is one of AWS’s governance best practices. You should use this account for org-wide security tooling like GuardDuty and Macie. This account should also be trusted for a security-audit role deployed into all the AWS accounts at your organization. Ensure your SOC and IR teams can log into the Security Account (ReadOnly access) and the ability to AssumeRole to the security-audit role in all the other accounts.
If your organization is so inclined, it’s also good to have a dedicated Responder role that has all the visibility of the Security-Audit role, plus the ability to execute some or all of the containment actions documented in this post. Work with your central cloud engineering team to define what steps security can take to perform containment and what needs to be escalated to the cloud team or application owners.
Finally, don’t use this account for security workloads (like your SEIM or EDR). The more network things you put in there, the greater the chance the security account itself can be compromised.
SEIM & Search
All this data needs to be searchable. What also needs to be searchable is your on-prem and other telemetry. How do you correlate your CloudTrail sourceIPAddress with your VPN Logs or SSO provider?
Even if you don’t have a SEIM or SOAR platform - use something like Slack to bubble up alerts to your responders.
Inventory
Inventory is critical to know what you have and to decorate the business context around your events. If you see anomalous behavior in an account, is that a prod account that no one should be accessing, or is it a sandbox where things get tested? Does the impacted resource have PII, PCI, or financials? Who do you need to contact about the event?
All of this is the critical business context that AWS cannot provide.
I’ll discuss this in future blog posts, but Steampipe is a valuable tool to pull account inventory information. I’ve built some scripts to pull Steampipe data into Splunk Lookup Tables.
Gluing it all together
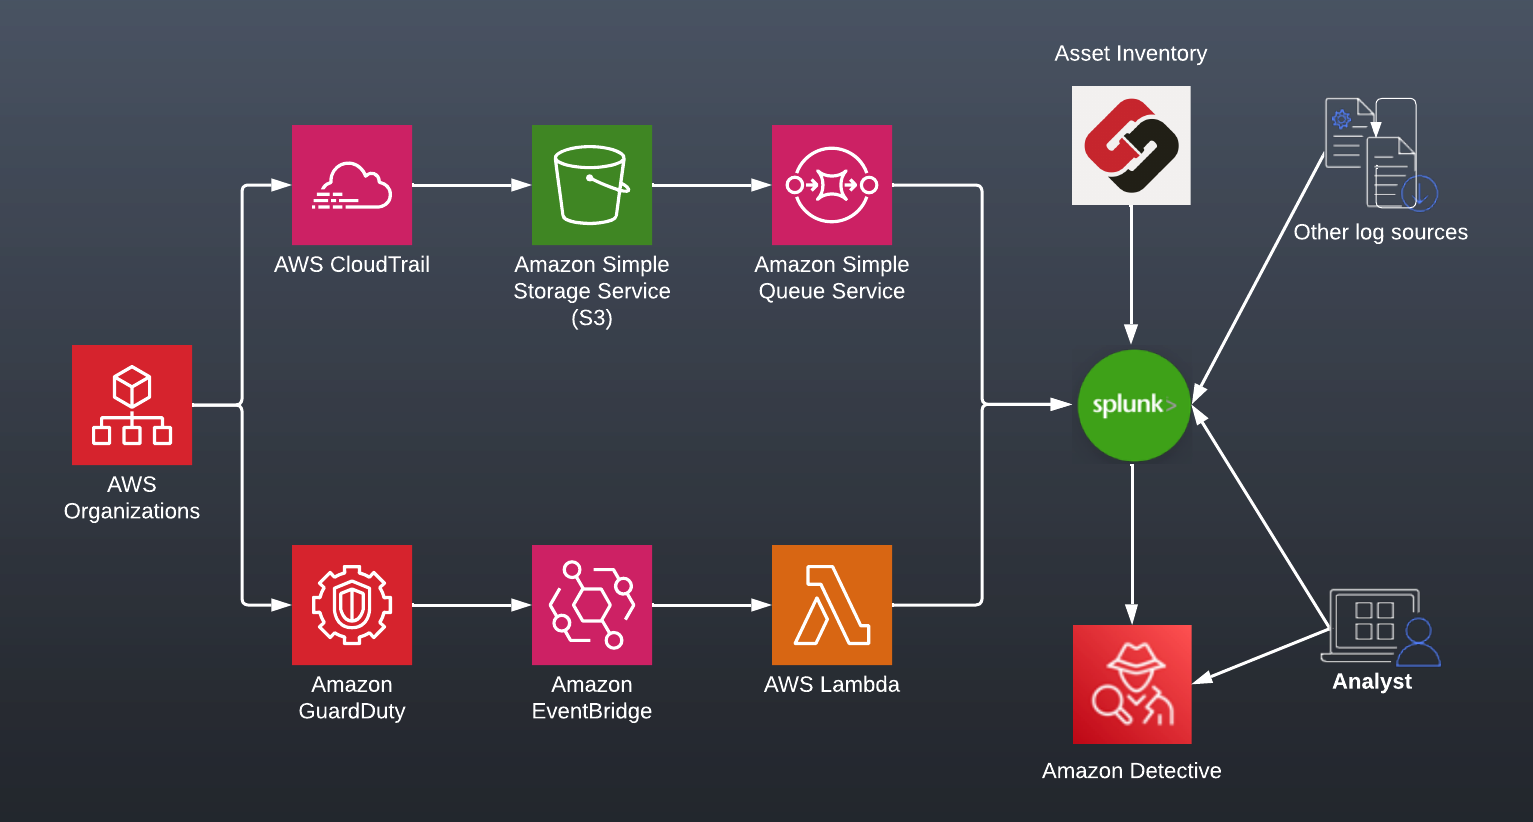
This is how I recommend companies architect to get the core telemetry into their SEIM - specifically for me, Splunk.
- Leverage the capabilities of AWS Organizations and Delegated Admin to enable and manage CloudTrail & GuardDuty in all accounts
- For CloudTrail, leverage S3 Events and SQS to tell Splunk what objects to ingest.
- For GuardDuty, subscribe a Lambda to the event bus and push findings via the HTTP Event Collector.
- Leverage Steampipe or your CMDB as a decoration for the events. Specifically:
- Account Names
- Points of Contact
- Environment & application
- Leverage other data sources like VPN Logs, SSO authentications, etc.
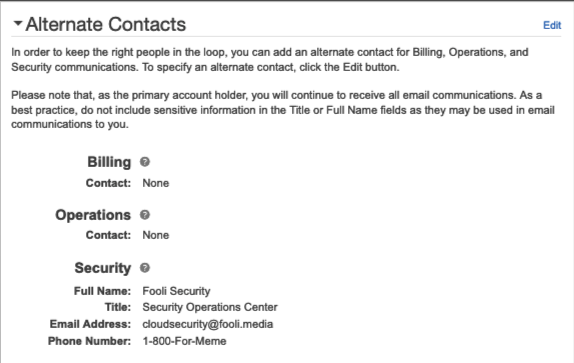
Security Contacts & Root Emails
Setting the security contacts for an account is often ignored, but super important. By default, AWS will send critical abuse and security notices to the root email address on the account. However, the security team is rarely on that, and AWS sends lots of other marketing spam to the root addresses.
Establish a cloudsecurity-alerts distribution list for your company and set that as the Security Contact in all your AWS Accounts. AWS now allows you to do that via the API, and I’ve written a fast-fix to help.
Other Tooling
- VPC FlowLogs will help you understand the network plane stuff. Who is coming and going from your castle?
- Preparing to conduct an EC2 or Container forensic operation is best done before you need to do that.
- Detective is a managed capability from AWS to help you understand and investigate events, but it’s pretty expensive. This is useful if you don’t already have the tooling to help
- Macie is great for finding the PII in your environment. PII is like radioactive waste; you want to know where it is so you can avoid it. I’ve already written a bunch on Macie.
Building a Detection Catalog
Ok, I have 3 billion blobs of JSON in S3, now what?

Link to CloudTrail Sightings
| Higher Fidelity Events | Common but Significant |
|---|---|
| CreateTrustAnchor | ConsoleLogin |
| CreateUser | GetFederationToken |
| CreateLoginProfile | StartSession |
| UpdateLoginProfile | GetAuthorizationToken |
| CreateAccessKey | CreateKeyPair |
| AttachUserPolicy | CreateRole |
| DeleteTrail | PutUserPolicy |
| PutEventSelectors | PutGroupPolicy |
| StopLogging | CreateGroup |
| LeaveOrganization | AttachRolePolicy |
| DeleteFlowLogs | PutRolePolicy |
| DeleteVpc | CreatePolicyVersion |
| GetPasswordData | UpdateAssumeRolePolicy |
| GetSecretValue | UpdateFunctionConfiguration |
| ModifyImageAttribute | ListSecrets |
| ModifySnapshotAttribute | |
| PutBucketPolicy | |
| PutBucketAcl |
Many of these were taken from Zack Allen’s excellent cloudtrail2sightings repo
Here are some of the detections I like to use and alert on. These lack a lot of proprietary filtering and cross-referencing, so you’ll need to tune these for your environment.
Evasion Detection
The first one is obvious: Look for any attempt to mess around with CloudTrail or GuardDuty.
index=cloudtrail
eventName=StopLogging OR DeleteTrail OR PutEventSelectors OR DeleteDetector
| iplocation sourceIPAddress
| table userIdentity.arn, sourceIPAddress,
  City, Country
If someone is doing one of these, that’s probably bad. If they’re not doing it from a location where you normally operate, that’s worse.
Is iplocation required here? No, but it can help provide context or give me an idea of which event to jump on first.
Where are Errors Coming From?
Here is another one that can bring up interesting results. This query looks at all the error messages and where they came from. You might expect to see a lot from Ashburn or the AWS regions where applications are active. Fewer from Minsk or Samarkand.
index=cloudtrail errorMessage=*
| iplocation sourceIPAddress
| stats count by City, Country
| sort -City, Country
This will get a lot of hits. Developers & Engineers will make mistakes with their IAM Policies and may not notice the errors are occurring. Also, some folks may not have permission to see stuff, but if they’ve got access to the AWS Console, the Console is going to make the API call for them.
However, if you look at the long tail, you may find someone who has some access credentials and is just testing out what they do and hitting errors.
Weird Credential Usage
Another example of looking at the long-tail of sourceIPAddress is this one:
index=cloudtrail
eventName=GetCallerIdentity OR ListBuckets OR DescribeInstances
| iplocation sourceIPAddress
| table userIdentity.arn, sourceIPAddress,
  City, Country
| sort -City, Country
The shortest AWS command is aws s3 ls, which translates to the ListBuckets eventName. The next most common recon command is aws sts get-caller-identity (the whoami of AWS). Interestingly, STS GetCallerIdentity is one of the few AWS API commands that does NOT require any authz to perform. You cannot DENY it via IAM.
DescribeInstances is another semi-common recon command.
Here we’re going to IP Lookup their location and again look at the long tail of location.
Persistence Detection
One last detection example. Here we see the creation of an IAM User. A super common way to establish persistence.
eventName="CreateUser"
| iplocation sourceIPAddress
| search Country!="United States"
| table userIdentity.arn, sourceIPAddress,
  City, Country
IAM Users are somewhat common. They’re still the most common way to interact with on-prem systems or other cloud providers. However, if you see them created from strange places, that’s something to look into.
And all of these are just looking at GeoLocation data. Depending on your org and culture, you might be able to filter these queries using sourceIPAddress for even better fidelity.
Identification
… or … How your day will be ruined
You’re most likely to get notified of an incident from one of these:
- AWS Trust & Safety
- Your AWS Bill / Billing Alerts
- Service Impacts
- Your Detection Catalog
- GuardDuty

CloudTrail Investigation
Here is an abstraction of the investigation flow I use when looking at an event:

If the event relates to a resource, one that is probably acting maliciously, I want to know: who created it? Then I look at the identity that created it to see what else that identity did.
- Did they create other resources?
- Did they modify other identities?
- What Source IP Addresses did they come from? Then I look at the Source IP Address. What other identities used that SourceIPAddress? Did any of them do anything that seems malicious?
You need to recurse all the paths of Identity and sourceIPAddress until you have a full picture of what the attacker did.
you can tie various eventNames into the various MITRE TTPs
- s3:ListBuckets is enumeration
- s3:GetObject is exfiltration
- cloudtrail:StopLogging is evasion
- iam:CreateUser is persistence
Zack Allen at DataDog has started a good repo to do that mapping.
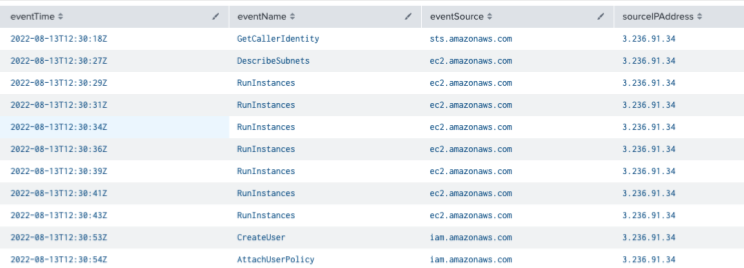
We can start with a query on a suspect resource:
index="aws_cloudtrail" "i-086c8727e55bb6d68"
readOnly=false
| table eventName, eventSource, userIdentity.arn, sourceIPAddress
You’ll get a result like
{ [-]
   awsRegion: us-east-1
   eventCategory: Management
   eventID: 7b4856eb-8c0c-4e66-969c
   eventName: RunInstances
   eventSource: ec2.amazonaws.com
   eventTime: 2022-08-13T12:30:36Z
   eventType: AwsApiCall
   eventVersion: 1.08
   managementEvent: true
   readOnly: false
   recipientAccountId: 755629548949
   requestParameters: { [-]
     blockDeviceMapping: { [+] }
     disableApiStop: false
     disableApiTermination: false
     instanceType: t2.micro
     instancesSet: { [-]
       items: [ [-]
         { imageId: ami-0a25ed80a0ff1d536
         } ] }
     monitoring: { [+] }
     subnetId: subnet-0dc76374a87f3d69c
   }
   responseElements: { [+] }
   sourceIPAddress: 3.236.91.34
   tlsDetails: { [+] }
   userAgent:
aws-cli/2.7.20 Python/3.9.11 Linux/5.15.0-1015-aws exe/x86_64.ubuntu.22 prompt/off command/ec2.run-instances
   userIdentity: { [-]
     accessKeyId: ASIA273YH4WKQTS7ZTUB
     accountId: 755629548949
     arn: arn:aws:sts::755629548949:assumed-role/Developer/testing
     principalId: AROA273YH4WKXW4OHPYYD:testing
     sessionContext: { [+]
     }
     type: AssumedRole
   }
}
From looking at the actual event, we know:
- The instance size:
t2.micro - The Image used:
ami-0a25ed80a0ff1d536 - The IP of the creator:
3.236.91.34 - It was created using the AWS CLI from a Linux machine (see the userAgent)
- By someone authenticated as the Developer Role
Next, you want to investigate that role with:
index="aws_cloudtrail" userIdentity.arn=arn:aws:sts::759429568549:assumed-role/Developer/*
| table eventName, eventSource, sourceIPAddress
Look for Lateral/Vertical Movement
Lateral movement can be either host-to-host as we conventionally think of it. Or it can be cloud-account to cloud-account. Additionally, there are ways to pivot vertically from Ground to Cloud and Cloud to Ground.
AWS AssumeRole calls into other AWS accounts can be an indicator of cloud-plane lateral movement
AuthorizeSecurityGroupIngress as I described at the top of this talk, could be someone using the cloud to work around network controls to facilitate lateral movement in your network.
Signs of Lateral or Vertical Movement:
- sts:AssumeRole (Cloud to Cloud)
- ssm:StartSession (Cloud to Ground)
- ssm:SendCommand (Cloud to Ground)
- ec2-instance-connect:SendSSHPublicKey (Cloud to Ground)
- ec2:AuthorizeSecurityGroupIngress (Cloud to Ground, or Ground to Ground)
- VPC Flow Logs (Ground to Ground)
Note: these actions are abbreviated using IAM Action syntax
AWS SSM is a server management service. If you see someone making SSM calls, that could be Cloud to Ground movement. Same with the EC2 Instance Connect service, which allows you to manage SSH keys on a machine. In both cases, some cloud-plane identity is manipulating things at the network level inside your instance.
Lateral Movement Query:
index=cloudtrail eventName=AssumeRole OR StartSession OR SendCommand OR SendSSHPublicKey | stats count by eventName, userIdentity.arn, sourceIPAddress

Containment & Eradication
So, you’ve identified an incident. Now what? Panic?

Start with these:
- See what IR processes have already happened. Did AWS apply a quarantine policy to that access key pushed to a public GitHub repo?
- Lock the attacker out by invalidating the access keys or session token.
- Identify the initial access vector. How did they get creds in the first place?
- Figure out what the attacker did.
- Look for Lateral/Vertical Movement. Did the move between network and cloud plane? Did they go between cloud identities or cloud accounts?
Access Key Quarantine
If you publicly commit Access Keys to GitHub (Like I did to generate the image below), you’ll get this email, and AWS will automatically apply a Quarantine policy to the user. This policy doesn’t block all use of the user. Instead, it just prevents the user from spinning up a lot of Compute resources to mine bitcoin. Most things are still allowed. The purpose here is to protect AWS from runaway resource usage and having to give you massive credit.
This email and policy attachment is all automated. I committed a key at 15:14:39, and by 15:16:30, AWS had already locked it down. So under two minutes.
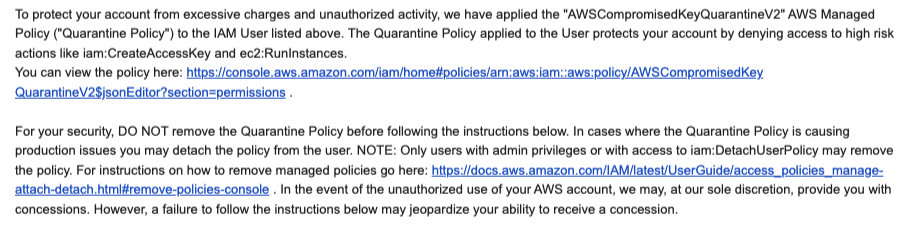
Here is the description of the policy:
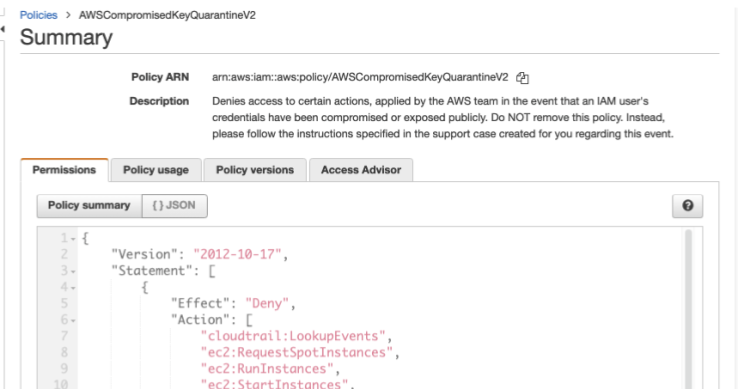
It denies specific actions most likely to cause financial harm or allow an attacker to pivot to another account. That first action up there, cloudtrail:LookupEvents, is a way an attacker can recon to see if there are other roles in other accounts he or she could assume.
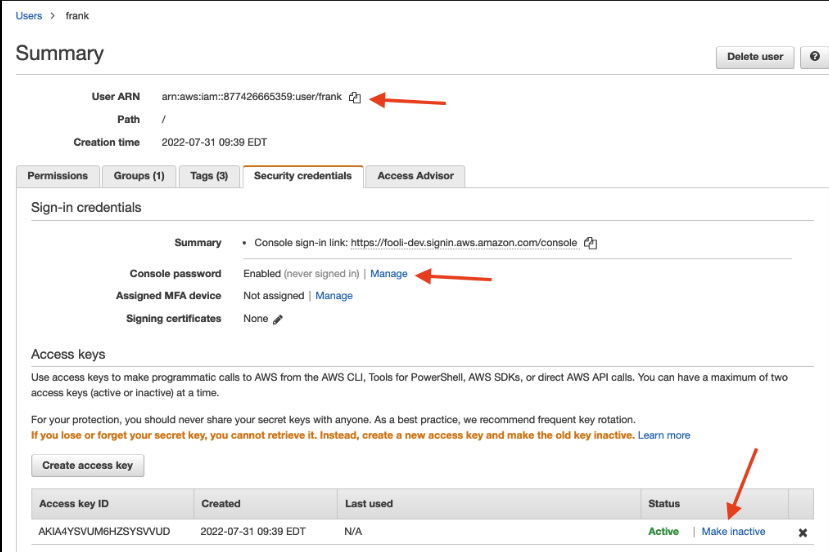
Disable the Access key
The Quarantine Policy isn’t enough. You want to disable the key ASAP! Note: you want to disable the key, don’t delete it. You may not know the service impact of disabling the key at the outset of the incident. You may need to re-enable it to recover from a service impact.
This is one of the powers your responder role should have.
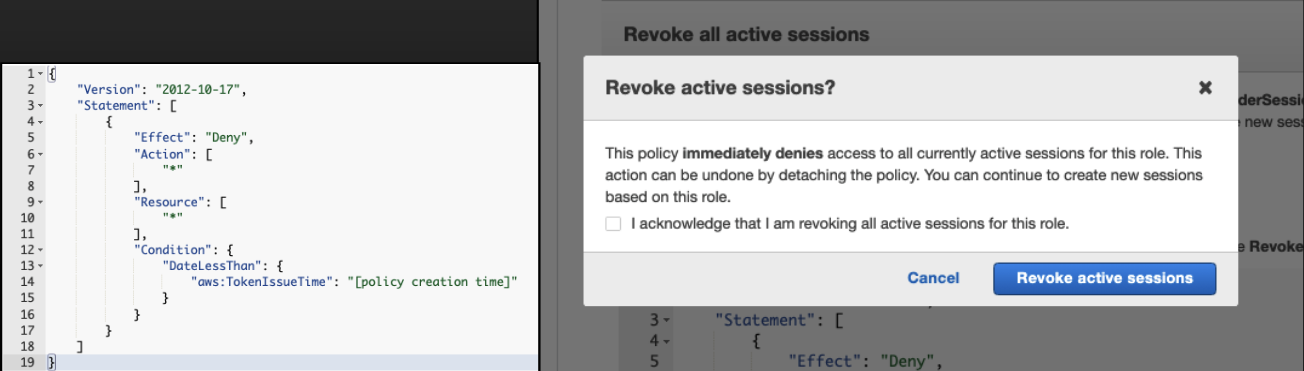
Revoke Active Sessions
For the temporary credentials that Lambda, EC2 Instances, and Containers use, you need to invalidate the compromised credentials. Via the AWS console, you can say, “Deny everything for all sessions created before X date-time”. Legit Apps should recover and ask for new keys. But, attackers may be able to use the same exploit again.
Apply your own Deny Policy
If you can’t identify the initial source of compromise, one option is to deny everything. They can no longer do any damage, But you can watch what they’re doing or trying to do. You’ve got two options for a deny policy, depending on impact and the general knowledge of the app.
This one will straight-up deny everything. Start here if you’re not sure and ok breaking prod.
{
  "Version": "2012-10-17",
  "Statement": [
    {
      "Effect": "Deny",
      "Action": ["*"],
      "Resource": ["*"]
    }
  ]
}
This one is more nuanced and will deny all actions except what’s the array of THINGS YOU NEED.
{
  "Version": "2012-10-17",
  "Statement": [
    {
      "Effect": "Deny",
      "NotAction": ["THINGS YOU NEED"],
      "Resource": ["*"]
    }
  ]
}
You may need to talk to your developers to get a list of the things you need.
Apply IP Address Condition
A twist on the previous containment option is to limit the use of the credentials to a handful of known and trusted IP addresses. This can reduce the service impact while also limiting your attacker’s ability to use the credentials.
{
  "Version": "2012-10-17",
  "Statement": [
    {
      "Effect": "Deny",
      "Action": ["*"],
      "Resource": ["*"],
      "Condition": {
        "Bool": {"aws:ViaAWSService": "false"},
        "NotIpAddress": {
          "aws:SourceIp": ["192.0.2.0/24","203.0.113.19/32"]
        }
      }
    }
  ]
}
Identify the initial access vector
One key thing you’ll need to do as part of containment is to figure out how they got in in the first place. If it was leaked keys to GitHub, that’s easy. If attacker exfiltrated the credentials from an EC2 instance or container due to an application issue, that will be a bit harder to find. With EC2 Instance Roles, the Instance ID is part of the Role Session Name, which may help you.
But if you can’t find the initial vector, you’ll play wack-a-mole with containment, or you’ll have to be more impactful with the containment policies you apply. This is one reason that best-practice is to have one role per resource or app (the other is to maintain least-privilege).
Was there a Data Breach
What we’ve looked at so far is great to find out if your attacker modified anything, created cryptominers or bots, etc.
But how can you tell if they got your data? You may see a ListBuckets eventName, but that is not proof of any data exfiltration.
I mentioned the Data Events when talking about CloudTrail. They’re really voluminous, so I don’t feed them into a SEIM. Instead, I keep them in S3 because I only ever need them for occasional cost optimization research or in the event of an incident.
To query CloudTrail events in S3, you can use Athena. I’ll point you at the AWS Documentation for setting this up, they have an excellent explanation.
Here I’m pulling a report of all S3 Access in an account. I can use the WHERE clause if I need to limit by a specific IP Address or Identity.
Conclusion
I hope this helps with some of the things you may experience during an incident in AWS. One last thing to note, like your middle school math teacher, I made you do all this work, before teaching the short-cut method. AWS has a team that’s dedicated to helping support customers in the middle of an incident. It’s called the Customer Incident Response Team, and most importantly, it does NOT require you to have their top-tier 5-figure Support plan. It’s open to any AWS customer regardless of size and support plan.